The great office organization of 2011 (aka my dad’s office, which has been accumulating paper for 25 years) has made slow and steady progress. We started with paperwork and then moved on to establishing organizing systems throughout the office. My dad has systems in place, but they are no longer working. So the key has been to take the systems he is comfortable with and make them more effective as we clear the clutter.
With loads of storage space in the bookshelf cabinets, it was easy to set it and forget it when it came to paperwork and clutter. It was time to tackle what lurked behind the cabinet doors.
When I arrived on the scene, the cabinets were stuffed, making it hard to put anything away. Nothing really had a home, so it’s easy to see why clutter accumulated. An old printer stashed under the new printer didn’t leave much room to store paper supplies. Instead, most supplies were stashed on the overflowing flat surfaces.
Donating the old, but still usable, printer made room for a multi-level tray to store various types of printer paper. We also housed brochures and letterhead in the boxes on the bottom left next to the tray to keep paper in one area.
Right next to the printer are two boxes for storage of computer related accessories. The lower re-purposed photo box holds printer software information and the open-topped box holds chargers and headphones for easy access.
The next cabinet we tackled was the “supply” cabinet. Items were piled in front of each other which made it hard to get to supplies. In order to reach what you needed you had to excavate half of the shelf first!
That all changed as we removed and sorted everything in the cabinet. The bottom shelf is now designated as the official envelope shelf. It holds all different types of envelopes, from labeled envelopes to larger mailing envelopes all organized on a cookie sheet rack to keep the envelopes separated and accessible. A perfect example of storing like with like.
The cookie sheet rack serves double duty holding envelopes and supplies for bank and post office trips. This made the cabinet functional as a go to errand cabinet. By using the upper shelf to hold supplies for sending out bulk mail, the cabinet becomes a one stop shop for everything my dad needs for these trips. The supply cabinet now lives up to its name.
Hidden in the top of my dad’s supply cabinet was his cardboard bill box with paid bills, semi-organized by company. As we strategized the overall office organization I asked him what he liked and what was currently working. He mentioned this bill box as a system he liked. Plus it was working, since there were no bills lying around on his desk. We kept the system, but amped it up a notch.
I switched out the cardboard for a sturdier plastic container fitted with file dividers. I considered using sticky tabs, but the box needed more structure. Plus, I knew anytime he added the latest bill to a category, it could mess up the placement of the original tab. Instead, I choose to cut file folders in half and label them.
Outcome? My dad still has the bill box he loves and uses constantly, but now the system is more functional.
We were almost done!
The final cabinet held the back up files that didn’t fit in the file cabinet. Extra paper and clutter took up every inch of space.
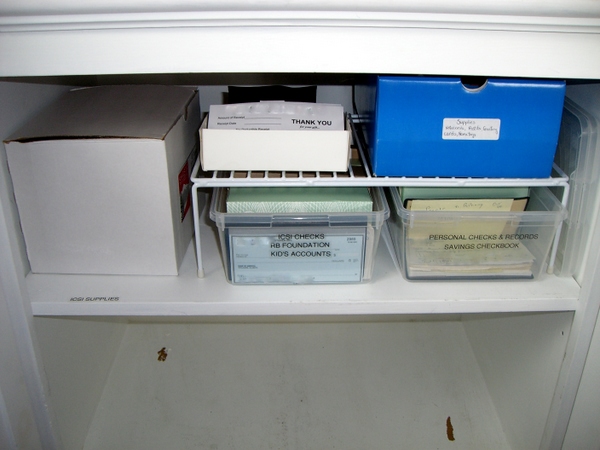
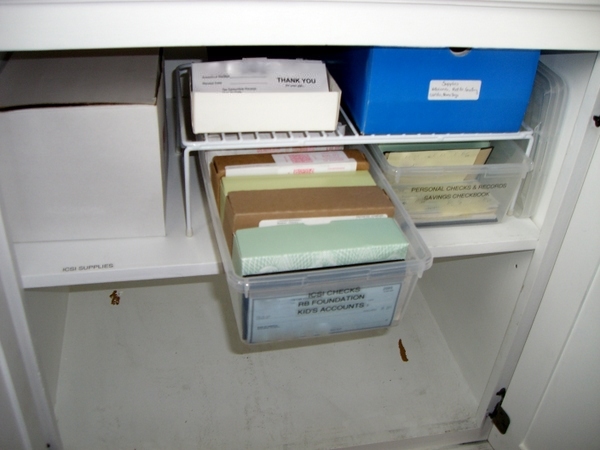
With paper sorting and empty check boxes combined, I used one of my favorite strategies, drawers.
He has a lot of separate accounts to keep track of and the checkbooks and records of each of those accounts. Now whenever he needs to write a check from one of the accounts (which for some of them isn’t very often) he pulls out the labeled drawer for simple retrieval.
So simple yet effective! The bottom shelf is still in progress. It will eventually be long-term file storage in a file box for tax related items which need to be held on to but not referred to often. The beauty is that if he ever needs the extra space he can easily move the file box into the garage for long term storage.
With the 3 cabinets now organized, the bookshelf takes on a new life. The before picture shows how every flat surface of the counter was covered.
The after picture shows the bookshelf is clear of clutter, and more importantly has systems in place to combat paperwork pile up.
Do you remember what the desk originally looked like?
The desk is clear! It is like a brand new space.
And just for fun, a pic of the corner that once looked like this.
Now the corner is clear and doesn’t zap energy while trying to focus on work in the office.
One reason why paperwork can feel so overwhelming is because it takes so much time to sort through. This was not a fast project but it was definitely worth it! Here is the break down.
Organizing by the Numbers
Total time ~ 17.5 hours spread across 7 days
Total $ ~ $50 for office supplies and $20 for decor
There is no argument that the improved efficiency along with peace of mind is worth the time spent. No more time will be wasted searching through papers and it is now a space my dad is happy to work in.
How has organizing saved you time? Anyone else tackle any big projects recently?


Paper totally gets me every time! Love the post! The office made a complete transformation!
That's truly inspirational! Must have felt so wonderful to get that done!
Oh my goodness! Your dad's office looks awesome! You are so good at this! You have definitely found your niche.